Deck Sanding In Perth: How To Achieve A Flawless Finish Every Time
A well-maintained deck is a prized feature for any home, offering an inviting space for relaxation and entertaining. Over time, however, exposure to the elements can leave your deck looking worn and weathered. Deck sanding is a crucial part of maintaining your deck’s appearance and longevity. This guide will walk you through the process of deck sanding in Perth, ensuring you achieve a flawless finish every time.
Why Sand Your Deck?
Sanding is essential for several reasons:
- Restores the Deck’s Surface: Sanding removes the top layer of old stain, paint, and grime, revealing the fresh wood underneath.
- Smoothens the Surface: A smooth deck is safer and more pleasant to walk on, reducing the risk of splinters.
- Improves Stain and Sealant Adhesion: Sanding opens up the wood grain, allowing for better absorption of stains and sealants, which prolongs the life of the finish.
Preparing for Deck Sanding
Before you begin sanding, proper preparation is crucial to ensure the best results.
Inspect the Deck
Start by thoroughly inspecting your deck for any damage. Look for loose nails, screws, or boards. Repair or replace any damaged sections to prevent further deterioration.
Clean the Deck
A clean deck is essential for effective sanding. Remove any debris, dirt, or mildew using a deck cleaner or a mixture of water and mild detergent. A pressure washer can be useful, but use it cautiously to avoid damaging the wood.
Allow the Deck to Dry
After cleaning, let the deck dry completely. This can take 24 to 48 hours, depending on the weather. Sanding a wet deck can cause the sandpaper to clog and the wood to splinter.

Choosing the Right Sandpaper
Selecting the appropriate sandpaper grit is vital for achieving a smooth finish.
Coarse Grit Sandpaper
Start with coarse-grit sandpaper (40-60 grit) if your deck has deep stains, rough patches, or old paint. This will quickly remove the top layers of the wood.
Medium Grit Sandpaper
Next, use medium-grit sandpaper (80-100 grit) to smooth out the surface after using the coarse grit. This step helps to remove any scratches left by the coarse sandpaper.
Fine Grit Sandpaper
Finish with fine-grit sandpaper (120-150 grit) to achieve a smooth, even surface. This step is crucial for preparing the wood for staining or sealing.
Sanding Techniques
The way you sand your deck can significantly impact the final result. Here are some techniques to follow:
Use a Power Sander
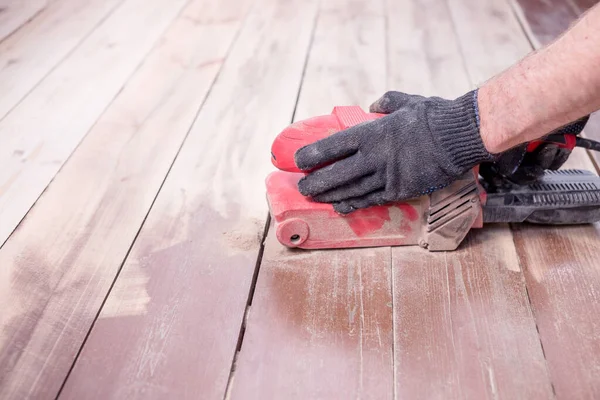
A power sander, such as a belt sander or orbital sander, can make the job easier and faster. Ensure you use the appropriate sandpaper grit for each stage of sanding.
Sand with the Grain
Always sand in the direction of the wood grain. Sanding against the grain can cause scratches and an uneven surface.
Overlap Your Passes
To ensure an even finish, overlap your passes slightly. This helps to avoid creating noticeable lines or patches on the deck.
Edging and Hard-to-Reach Areas
Some areas of your deck, such as corners and edges, may be difficult to reach with a power sander. Use a hand sander or sandpaper wrapped around a sanding block to tackle these spots. Take your time to ensure these areas are as smooth as the rest of the deck.
Post-Sanding Cleanup
After sanding, it's important to clean up thoroughly before applying any stain or sealant.

Remove Dust
Use a vacuum or leaf blower to remove the majority of the dust from the deck. Follow up with a damp cloth to wipe down the surface and remove any remaining dust particles. This step is crucial to ensure a smooth, even finish when staining or sealing.
Choosing the Right Finish
The final step in achieving a flawless deck is selecting and applying the right finish.
Types of Finishes
There are several types of finishes to choose from, including:
- Oil-Based Stains: These penetrate deep into the wood, providing excellent protection and durability.
- Water-Based Stains: These are easier to clean up and dry faster than oil-based stains. They also have less odor.
- Clear Sealants: These provide a natural look while protecting the wood from moisture and UV rays.
- Semi-Transparent Stains: These offer a balance between showing the wood grain and adding color.
- Solid Stains: These provide the most color but obscure the wood grain.
Applying the Finish
Deck sanding in Perth ensures a smooth, rejuvenated surface, enhancing both the aesthetic appeal and longevity of outdoor wooden decks in the region's diverse climate. Follow these steps for a professional-looking finish:
- Test the Stain: Test the stain on a small, inconspicuous area of the deck to ensure it provides the desired color and coverage.
- Apply Evenly: Use a brush, roller, or sprayer to apply the stain or sealant evenly across the deck. Work in small sections to ensure even coverage.
- Follow Manufacturer’s Instructions: Pay attention to the manufacturer's instructions regarding drying times and the number of coats required. Applying too much stain can lead to a sticky, uneven finish.
- Allow to Dry: Allow the deck to dry completely between coats, and after the final coat, before using the deck. This can take several hours to a few days, depending on the product and weather conditions.
Maintenance Tips
Regular maintenance will keep your deck looking its best and prolong its lifespan.
Regular Cleaning
Clean your deck regularly to remove dirt, debris, and mildew. This helps to prevent the buildup of grime and preserves the finish.
Inspect for Damage
Periodically inspect your deck for signs of damage, such as loose boards, nails, or screws. Address any issues promptly to prevent further deterioration.
Reapply Finish
Depending on the type of finish and the level of exposure to the elements, you may need to reapply the stain or sealant every 1-3 years. Regular maintenance coats help to maintain the deck's appearance and protect the wood.
Hawthorn VIC, Australia
Phone: 180-0332-525

